Infrastructure as Code
The first bits of Infrastructure as Code in Azure to deploy your first resources!

Introduction
In this short blogpost about Infrastructure as code (which I will call IaC for now) I will show you the first bits to deploy Azure resources by code.
In my daily work within Azure I come across allot of resources which mostly be created with the use of the Azure Portal. At least for most part. Once I did this more often I felt like there was a more efficient way to build these resources and have better control on this.
That’s where I found and started with Infrastructure as Code. And so far I think everyone should at least give it a try to understand how useful it is.
You can keep grip on your environments growth, make selections on certain options being used. Another benefit is that you can always redeploy a certain resource for backup purpose. Delete resources for testing purpose to be redeployed later. No more clicking through the Azure portal to setup a certain VM configuration. You can create, do your work on the resources and delete it afterward. Be it for testing a product/service, play with malware on vm’s or test new policy’s.
So what is IaC exactly?
Infrastructure as Code (IaC) is a way to manage and provision infrastructure resources through code, rather than using manual processes of clicking in the Azure Portal. This allows for more consistent and repeatable deployments, as well as easier management on infrastructure.
The Azure Resource Manager is the deployment and management tool for defining the infrastructure resources by templates. These templates allow you to specify the resources that you want to create, along with their settings and dependencies.
In case a resource already excists which also has the exact same name as specified in the template, it will update that configuration instead. Very useful if you want to roll out a change in the setup!
When you want to deploy a storage account for example we will need a ARM template in order to get things done. Within this template we will define the resource type we want to use, give it a nice name and add some additional configuration to make sure we get the correct resource to be deployed.
Pre-requisite
Lets start with a few preparations.
- Download/Install Visual Studio Code
- Azure Resource Manager (ARM) extension
- An Azure Tenant Azure Portal
- Motivation to get things done!
If you have Visual Studio Code already installed, that’s great! If you don’t, do not worry. You can download it right here and get started as soon as it is installed! When you open Visual Studio Code, take a look on the left menu and click on the “Extension” button.
Here you can search for many extension which will help you code in a sort of ways. For this one we will search for Azure Resource Manager (ARM).
Click on the “Install” button and once this is done, restart your Visual Studio Code. It sometimes does not recognize a arm syntax if it did not had a restart. Once restarted we can start with making our first template.
Lets build your first template!
So once we have these few preparations set we can continue creating our first template, and deploy it to Azure. Lets open up Visual Studio Code and create a new file.
When your fresh file is created click on the text “Select Language”. The search bar will open to search for a specific language. Search for “Azure Resource Manager Template”. This will start the ARM template extension you just installed. This will help us allot by starting off. Start by writing the following text and use TAB to autofill.
1
Arm!
As you see it will automatically create a scheme for us to fill.
1
2
3
4
5
6
7
8
9
{
    "$schema": "https://schema.management.azure.com/schemas/2019-04-01/deploymentTemplate.json#",
    "contentVersion": "1.0.0.0",
    "parameters": {},
    "functions": [],
    "variables": {},
    "resources": [],
    "outputs": {}
}
The ARM template is built with a JavaScript Object Notation (JSON) schema to give it structure. There are different schemes named by the date as you see in the URL above. I wont go into detail on this as I find the default URL will fit its purpose for now.
The different parameters
Content Version
Content Version is the version you want to give your template. Useful to show if its something new, or something that has been around for a while. Also, any copy that will later make its way to Github or Azure Devops will show people older versions to see what the changes were at the time of the version. Leave it for now.
Parameters
Parameters are values that are input to the template at the time of deployment. These values can be used to customize the deployment. For example, you could use a parameter to specify the location of your resources, the size of a virtual machine, or the name of a resource group. This way you can also select specific allowed options to choose from. For example when you want to use standard or premium storage types. This can be a significant difference in cost.
Functions
Functions makes it possible to create your own functions which will be available for you within your template. This is useful when you are using certain expressions multiple times.
Variables
Variables are named values that can be used to store output from functions or other expressions in the template. These values can be referenced elsewhere in the template, making it easier to write complex templates and avoid repeating the same values multiple times.
Resources
Resources are the services which reside in azure, such as virtual machines, virtual networks, and storage accounts. The template defines the type and settings for each resource.
Outputs
Outputs are values that are returned by the template after it has been deployed. These values can be used to display important information to the user, such as the fully qualified domain name of a web app or the IP address of a newly created VM.
So now we have a better view of the differences in the structure of JSON we can continue to build our Storage Account.
Place your cursor between the bracket of the resource parameter and start writing Storage. You will see that the pop-up will show you suggestions.
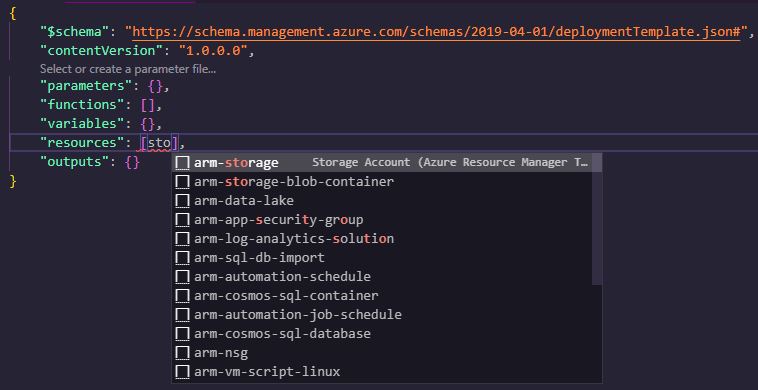
As soon as you have the right one selected, TAB and it will automatically write the correct schematic.
If you look closely you will see that the cursor has moved towards the name value and also on the displayname. Give it a nice name to remember and press TAB again. It will move to the next option until every part has been done. Very useful!
If you want a quickstart with different templates make sure to checkout Azure Github - Quickstart templates
Lets deploy!
Go to Azure Portal and login with your account.
Once you are logged in and are at the starting page, click “Create a Resource”.
Search in the up following search bar for “Template deployment (deploy using custom templates)”. Next click “Create”.
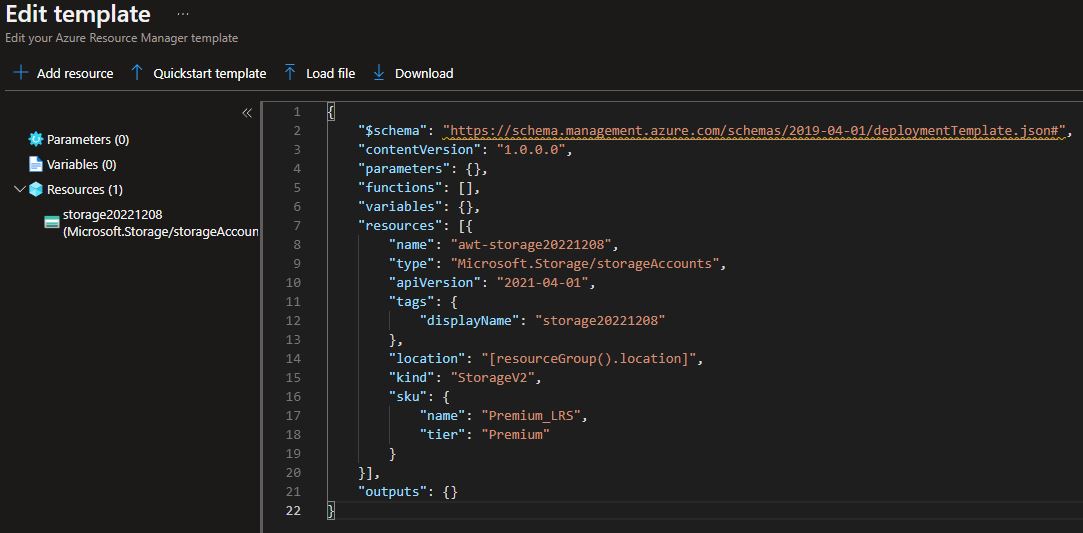
Click on “Build your own template in the editor”
Replace the sample code with your newly made template and click on the save button.
- On the next page click on “Create new” to make a new resource group to put your storage account in. I for example made a group “AWT-Storage”.
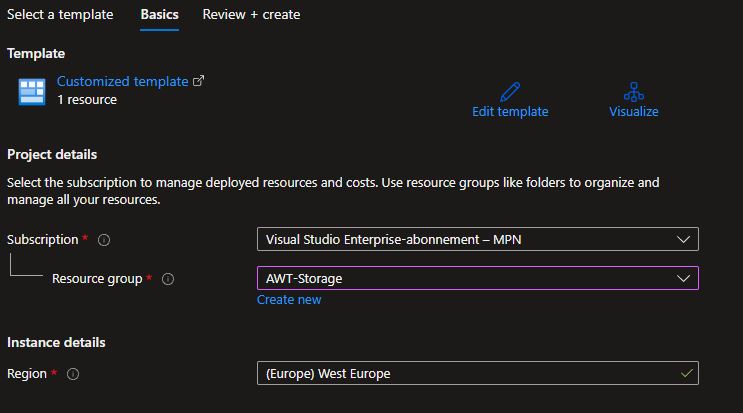
- Once your Resource group is created you can click “Review + Create” and continue to validate your new template.
If all went well and your code is correct it will tell you that the validation has passed and the template is ready to be deployed. You can now click on the “Create” button to start deploy your new resource.
The next page will show you the current progress of the deployment and shows you the deployment details. Note that there is a buttons to go straight to your new resource. Another thing to mention is that you can see all the deployment history in the resource group. Go to the resource group and click on “Deployments” under the Settings menu.
Resource deployed
If all went well you will have your storage account deployed in your specified resource group. Well done!
I hope that this small blogpost about IaC encourage you to explore more about the possibilities of templates as it makes Azure easier for you! Go explore and start building, be it a simple VM, Databricks, Keyvaults, it can be done with code! 😊
If you made it this far, thanks for taking the time reading!