Upload your analytic rules to Azure Devops
Today we will create our detection rules and make them available in Azure Devops
Create Sentinel Detection Rules and store them into Azure DevOps
So you’ve got your Sentinel set up and ready for action, complete with all the connectors. But hold on a second—where are the detection rules?! Creating detection rules from scratch can be a time-consuming process, and that’s probably not what you had in mind when you imagined your Sentinel coming to life.
Luckily, there’s a shortcut—and it comes from Microsoft’s GitHub page. This repository has most of the detection rules that usually come bundled with connector installations from the Content Hub. But here’s the catch: when you grab these rules from the Content Hub, they’re imported but not automatically enabled. You need to manually go through each rule, verify some statistics, and check the entities before you enable it. Depending on the complexity, this could take just a few minutes… or a lot longer.
Here’s what we can do to make this easier: the repository contains YAML files for these detection rules, and by using a little scripting magic, we can convert them to JSON. Why JSON, you ask? Because this format makes it easy to import the rules into DevOps, giving you a centralized place to manage, update, and stage your detection rules for deployment.
A big thanks to Fabian Bader for its continues work on the convertion module. Without this module the scripting would have been allot more work.
But it doesn’t stop there. By following this blog, you’ll be able to convert all these analytic rules from your chosen connectors and store them in a well-organized folder structure. I’ve set it up so that every rule is neatly organized in its respective connector folder. This makes sorting and finding the rules you need as easy as it gets, so you can customize and deploy them specifically for your environment.
In this first part we will create the analytic rules and store them into Azure devops.
Getting Started: Cloning, Converting, and storing your detection rules
Cloning
Let’s get to business:
- Head over to my GitHub repository: Mass YAML to JSON.
Clone or download the script to your local environment where you want it to be.
If you clone, copy the git line here and place it in the terminal in your VSCode:
1
   git clone https://github.com/awt-tom/mass-yaml-to-json.git
Converting
In a code editor like VSCode, use
cdto navigate to the directory where you cloned the repo.Execute the
Convert-YamlToJson.ps1script.
It will now do a few checks to see if Git and the PS Module SentinelARConverter are installed, as explained in this blog post link.
Once the check is done, it will import the Microsoft GitHub repository partly to grab the YAML files and convert them to JSON. Depending on the state of your internet connection and traffic, it might take some time. So grab some coffee or a beer in the process! It will only do this once. After it has been downloaded it will only update when there are any changes to the Microsoft Github.
If the download does not succeed due to the lack of the connection you can just re-run the script.
The conversion should have started by now, and once it’s finished, it will generate a folder containing subfolders based on the connectors that hold analytic rules.
- There is a folder created whith a date, easy for you to keep changes localy. Here you’ll find all the analytic rules in JSON format, ready for action. Currently there are 1400+ converted rules available.
Storing the detection rules
- Head over to dev.azure.com.
- Create a new project if you don’t have one yet, and create a new repo. Name it whatever you like.
- Copy the “Clone to your Computer” URL within your Devops repo and go back to VSCode. Create a new window to have a fresh space to work with.
- Open up a terminal and make sure you are in the right path.
- Run:
1
git clone {your URL}
Initialize the Git repository in your folder by running:
1
git init
If you have never committed code there is a possibility that you have to provide git with a name and e-mailaddress to be able to commit.
- There should now be a Git folder added to let the system know where and how to drop your freshly made Analytic Rules.
- Copy the folders with the desired connector names you’d like to import to the new Azure DevOps folder.
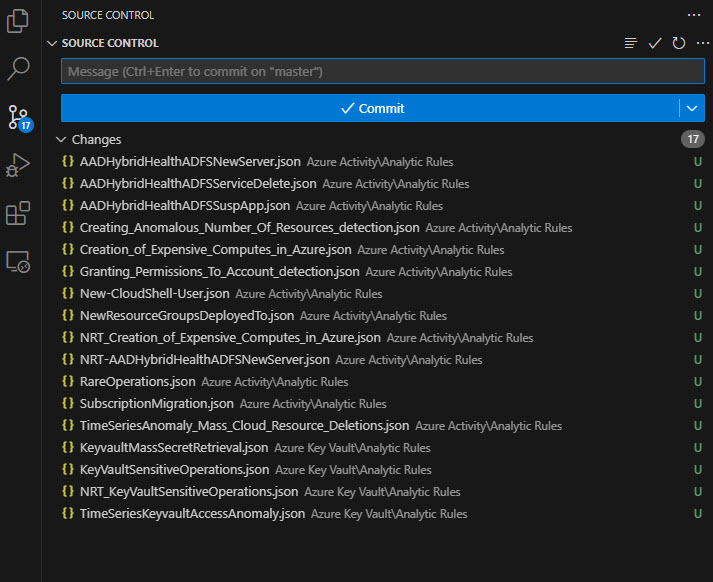
- Commit the rules with a descriptive comment.
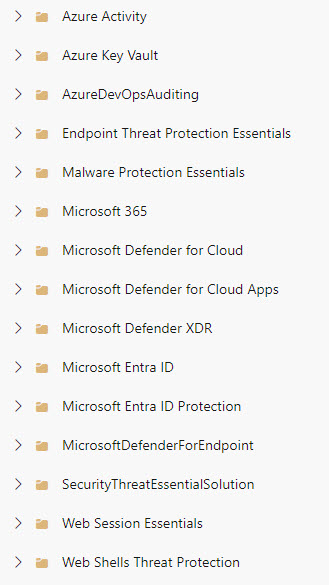
- Once commited, verify that your folder structure looks correct in the DevOps repo.
Conclusion: Automate and Optimize Your Sentinel Deployment
In this process, we’ve walked through the steps required to manually create and prepare your detection rules for deployment. We used scripting to convert the analytic rules from YAML format, available in the Microsoft Sentinel GitHub page, to JSON. In the next blog post, we will cover how to deploy these rules to Microsoft Sentinel. This approach allows you to create up-to-date analytic rules that are ready for validation and use, making your Sentinel setup more efficient and reliable. With proper testing and validation, you’ll be ready to detect threats quickly and effectively, ensuring your environment remains secure.


